

MelonDS offers flexibility when replaying Nintendo DS games, and one trick that is particularly underrated is being able to change which screen gets priority.
The DS twin-screen feature is one of its best-selling points. But on a laptop or a bigger horizontal monitor, you may find it fits differently.
By adjusting screen focus, layouts, or touch display size, you can reduce misclicks, follow battles more easily, and make touch-heavy games more playable without using your phone.
In this guide, you’ll discover why it’s important to switch screens, how melonDS manages both screens, the simple steps to swap them around, and the best settings to use for playing Pokemon games.
Learn more about DS gaming:
- 5 Best DS Emulators for PC
- DraStic DS Emulator Review For Playing Pokemon DS Games On Android
- Pokemon DS Rom Hacks List
- 5 Best Nintendo DS Emulators for Android

Why Screen Switching Matters
I always loved the dual-screen setup of the Nintendo DS. It definitely makes it stand out.
The top screen is perfect as the main display for the overworld, maps, and those cool story cutscenes. It’s where I get to see the game world come to life. The bottom screen, however, is the command center for moves, items, and tactical choices.
Without being able to swap or adjust which screen gets priority, you risk missing details or making errors.
Different Screen Layouts of melonDS

By default, melonDS presents both DS screens in a vertical stack, with the display screen above and the touch screen below.
While this is the most authentic layout, it doesn’t always fit every player’s preference. Knowing this, melonDS offers flexible layout options that let you adjust the way screens appear.
Natural/Vertical
The natural layout is the default option and mimics the original Nintendo DS perfectly. It’s basically the same as Vertical.
It’s ideal for those who want an authentic feel, especially in games where both screens are equally important.
However, depending on your monitor, the bottom screen may feel too small during heavy touch-input gameplay.
Horizontal
Having both screens side-by-side works really well on widescreen monitors or when streaming.
It gives each screen a bit more horizontal space, but it might feel a little less natural compared to the handheld DS design.
Hybrid
You can prioritize one screen by making it larger while shrinking the other. For example, during Pokemon battles, just enlarge the bottom screen and keep the top one smaller but still visible.
This option gives the best balance for games that switch focus often.
MelonDS Screen Settings
By playing around with these settings, you can find the perfect screen setup that’s made just for you. Here’s what each of them does.
Screen Size
This setting lets you adjust the size or scale of your screen. You can choose between 1x all the way to 4x.
Screen Rotation
This setting is perfect if you have a vertical monitor, as it lets you rotate the emulator screen at four different angles.
Screen Gap
One thing I didn’t like about the DS is the gap between its two screens. But this setting lets you remove that. Or make the gap bigger, if you’re into that kind of stuff.
Screen Sizing
Individual screen sizing lets you emphasize one display or force both even. Options include even, emphasize top, emphasize bottom, top only, or bottom only.
Aspect Ratio
Changing the ratio affects scaling behavior and aspect handling for each screen. Pick a ratio that preserves gameplay area without stretching UI elements; useful for games with distinct UI areas and touch-based inputs.
How to Switch Screens on melonDS (Step-by-Step Tutorial)
I used to be digging through the menus and thinking that switching screens on melonDS would be hidden somewhere complicated, but it’s actually pretty straightforward once you get used to it.
Step 1: Open Layout Settings

- For desktop, go to Config > Video/Layout.
- For Android, go to Settings > Layouts.
- You can pick from horizontal, vertical, or hybrid layouts, or swap screens like so.
Step 2: Assign Hotkeys
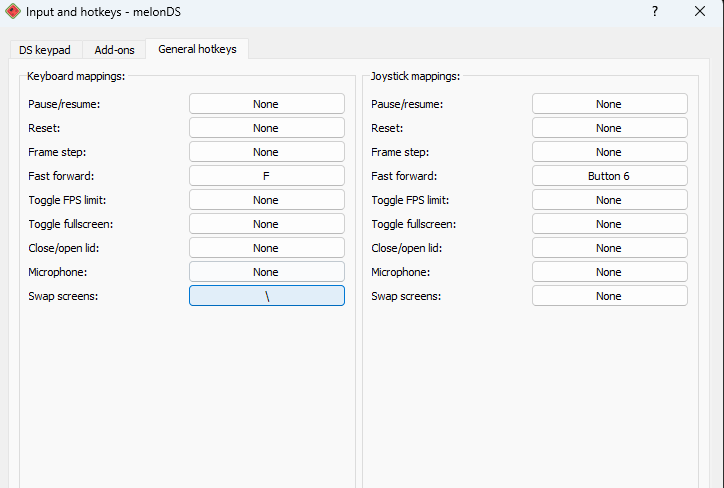
- Navigate to Settings > Input > Hotkeys.
- Look for the option labeled Swap Screens.
- Map it to a key that’s easy to reach, such as the \ key on the keyboard or L2 on a controller. You can also map other nifty functions here, like fast-forward, quick save/load, or microphone toggle if you want to.
Step 3: Adjust Fullscreen and Input Options
- Enable Fullscreen with F or F11, or assign your own key.
- If you’re on handheld devices and using a controller, disable Show Soft Input to remove on-screen buttons that block gameplay.
Step 4: Test In-Game
I like to start by loading up a game and swapping screens during different moments to see what feels most natural.
For Pokemon, the default MelonDS screen layout works best for most players. In touch-heavy games like Pokemon Ranger, I find it easier to keep the bottom screen as the main focus almost all the time.
Best Settings for Pokemon Games
Touch-heavy spin-offs (Ranger, Mystery Dungeon)
Keep the bottom screen larger by default. These games rely on drag/tap accuracy, and you don’t want cramped touch areas.
Consider enabling a layout that places the touch screen on the left for handhelds so your hand won’t obscure the view.
Mainline Pokemon (Diamond / Pearl / Platinum, etc.)
Most of the time, the default MelonDS screen layout is perfect. But if you want to be extreme, the bottom screen gets more attention when choosing your moves and targets.
So you can set up a one-button swap screen toggle to switch things up quickly when a battle kicks off.
Conclusion
Switching screens on melonDS is one of those tiny settings that can massively improve play.
Once you’ve created a layout you like and bound a swap key, the emulator suddenly feels tuned to you: battles are cleaner, touch inputs work without fuss, and you have a better quality-of-life feature.
Try saving multiple layouts for different Pokemon games. I keep one for mainline titles and one for touch-heavy spin-offs, and you’ll see how much less fiddly runs become, especially if you also play fighting games.
If you’re a fan of Pokemon and are looking for emulation tips, Pokemoncoders has you covered. Explore our collection of guides, recommendations, and cheat codes curated by veteran trainers who share your passion.
